Aptos Move 全栈实战:构建链上价格预言机与客户端交互
Table of Contents
Aptos Move 全栈实战:构建链上价格预言机与客户端交互
在区块链的世界里,智能合约如何与外部真实世界的数据交互,始终是一个核心命题。而“预言机”(Oracle)正是连接链上与链下世界的关键桥梁。本文将带你深入 Aptos 生态,使用强类型、高安全性的 Move 语言,从零开始构建一个实用的链上价格预言机。我们不仅将完成合约的编写、测试和部署,还将重点展示如何用 TypeScript 客户端与合约进行交互。这篇教程将为你提供一个完整的“全栈”视角,让你对 Aptos 智能合约的开发模式有更深刻的理解。
本文详细介绍了如何在 Aptos 上构建一个去中心化价格预言机,并实现客户端交互。内容涵盖了从项目初始化到 Move 合约的编写、测试和部署,以及如何使用 Aptos TypeScript SDK 实现与链上合约的读写交互。通过这个完整的实战案例,你将全面掌握 Aptos 智能合约的开发流程,了解如何将链上逻辑与链下应用无缝连接。
实操
创建并初始化项目
mcd price_feeds # mkdir price_feeds && cd price_feeds
cc # open -a Typora .
➜ aptos move init --name price_feeds
{
"Result": "Success"
}
hello_aptos/price_feeds on main [?] took 2.1s
➜ ls -a
. .. .gitignore Move.toml scripts sources tests
hello_aptos/price_feeds on main [?]
➜ aptos init
Configuring for profile default
Choose network from [devnet, testnet, mainnet, local, custom | defaults to devnet]
testnet
Enter your private key as a hex literal (0x...) [Current: None | No input: Generate new key (or keep one if present)]
No key given, generating key...
---
Aptos CLI is now set up for account 0xc327fa8bef56e4a0d1d82d6fdac8ddf4e0d31a907836810081cffa67c21601ee as profile default!
---
The account has not been funded on chain yet. To fund the account and get APT on testnet you must visit https://aptos.dev/network/faucet?address=0xc327fa8bef56e4a0d1d82d6fdac8ddf4e0d31a907836810081cffa67c21601ee
Press [Enter] to go there now >
{
"Result": "Success"
}
hello_aptos/price_feeds on main [?] took 15.4s
➜ aptos account balance
{
"Result": [
{
"asset_type": "coin",
"coin_type": "0x1::aptos_coin::AptosCoin",
"balance": 100000000
}
]
}
查看项目目录结构
➜ tree . -L 6 -I "docs|target|node_modules|build"
.
├── Move.toml
├── price_feeds_client
│   ├── aptos_utils.ts
│   ├── aptos_view.ts
│   ├── aptos_write.ts
│   ├── package.json
│   ├── pnpm-lock.yaml
│   └── tsconfig.json
├── scripts
├── sources
│   └── price_feeds.move
└── tests

5 directories, 8 files
实现合约
module price_feeds_addr::price_feeds {
    use std::vector;
    use std::string::{String, utf8};
    use std::timestamp;
    use std::signer;

    struct TokenFeed has store, drop, copy {
        last_price: u64,
        timestamp: u64
    }

    struct PriceFeeds has key, store, drop, copy {
        symbols: vector<String>,
        data: vector<TokenFeed>
    }

    /// Error Not Owner
    const E_NOT_OWNER: u64 = 101;

    fun init_module(owner: &signer) {
        let symbols = vector::empty<String>();
        symbols.push_back(utf8(b"BTC"));
        let new_feed = TokenFeed { last_price: 0, timestamp: 0 };

        let data_feed = PriceFeeds {
            symbols,
            data: (vector[new_feed])
        };

        move_to(owner, data_feed)
    }

    public entry fun update_feed(
        owner: &signer, last_price: u64, symbol: String
    ) acquires PriceFeeds {
        let signer_addr = signer::address_of(owner);
        assert!(signer_addr == @price_feeds_addr, E_NOT_OWNER);
        assert!(exists<PriceFeeds>(signer_addr) == true, 101);
        let time = timestamp::now_seconds();
        let data_store = borrow_global_mut<PriceFeeds>(signer_addr);
        let new_feed = TokenFeed { last_price, timestamp: time };
        let (result, index) = data_store.symbols.index_of(&symbol);
        if (result) {
            // data_store.data[index] = new_feed;
            data_store.data.remove(index);
            data_store.data.insert(index, new_feed);
        } else {
            data_store.data.push_back(new_feed);
            data_store.symbols.push_back(symbol);
        }
    }

    #[view]
    public fun get_token_price(symbol: String): TokenFeed acquires PriceFeeds {
        let symbols = borrow_global<PriceFeeds>(@price_feeds_addr).symbols;
        let (result, index) = symbols.index_of(&symbol);
        if (result) {
            borrow_global<PriceFeeds>(@price_feeds_addr).data[index]
        } else {
            TokenFeed { last_price: 0, timestamp: 0 }
        }
    }

    #[test_only]
    use std::debug::print;

    #[test(owner = @price_feeds_addr, init_addr = @0x1)]
    fun test_function(owner: &signer, init_addr: signer) acquires PriceFeeds {
        timestamp::set_time_has_started_for_testing(&init_addr);
        init_module(owner);
        update_feed(owner, 63400, utf8(b"BTC"));
        let result = get_token_price(utf8(b"BTC"));
        assert!(result.last_price == 63400, 0);
        print(&result);

        update_feed(owner, 1000, utf8(b"ETH"));
        result = get_token_price(utf8(b"ETH"));
        assert!(result.last_price == 1000, 0);
        print(&result);

        update_feed(owner, 62411, utf8(b"BTC"));
        result = get_token_price(utf8(b"BTC"));
        assert!(result.last_price == 62411, 0);
        print(&result);
    }
}
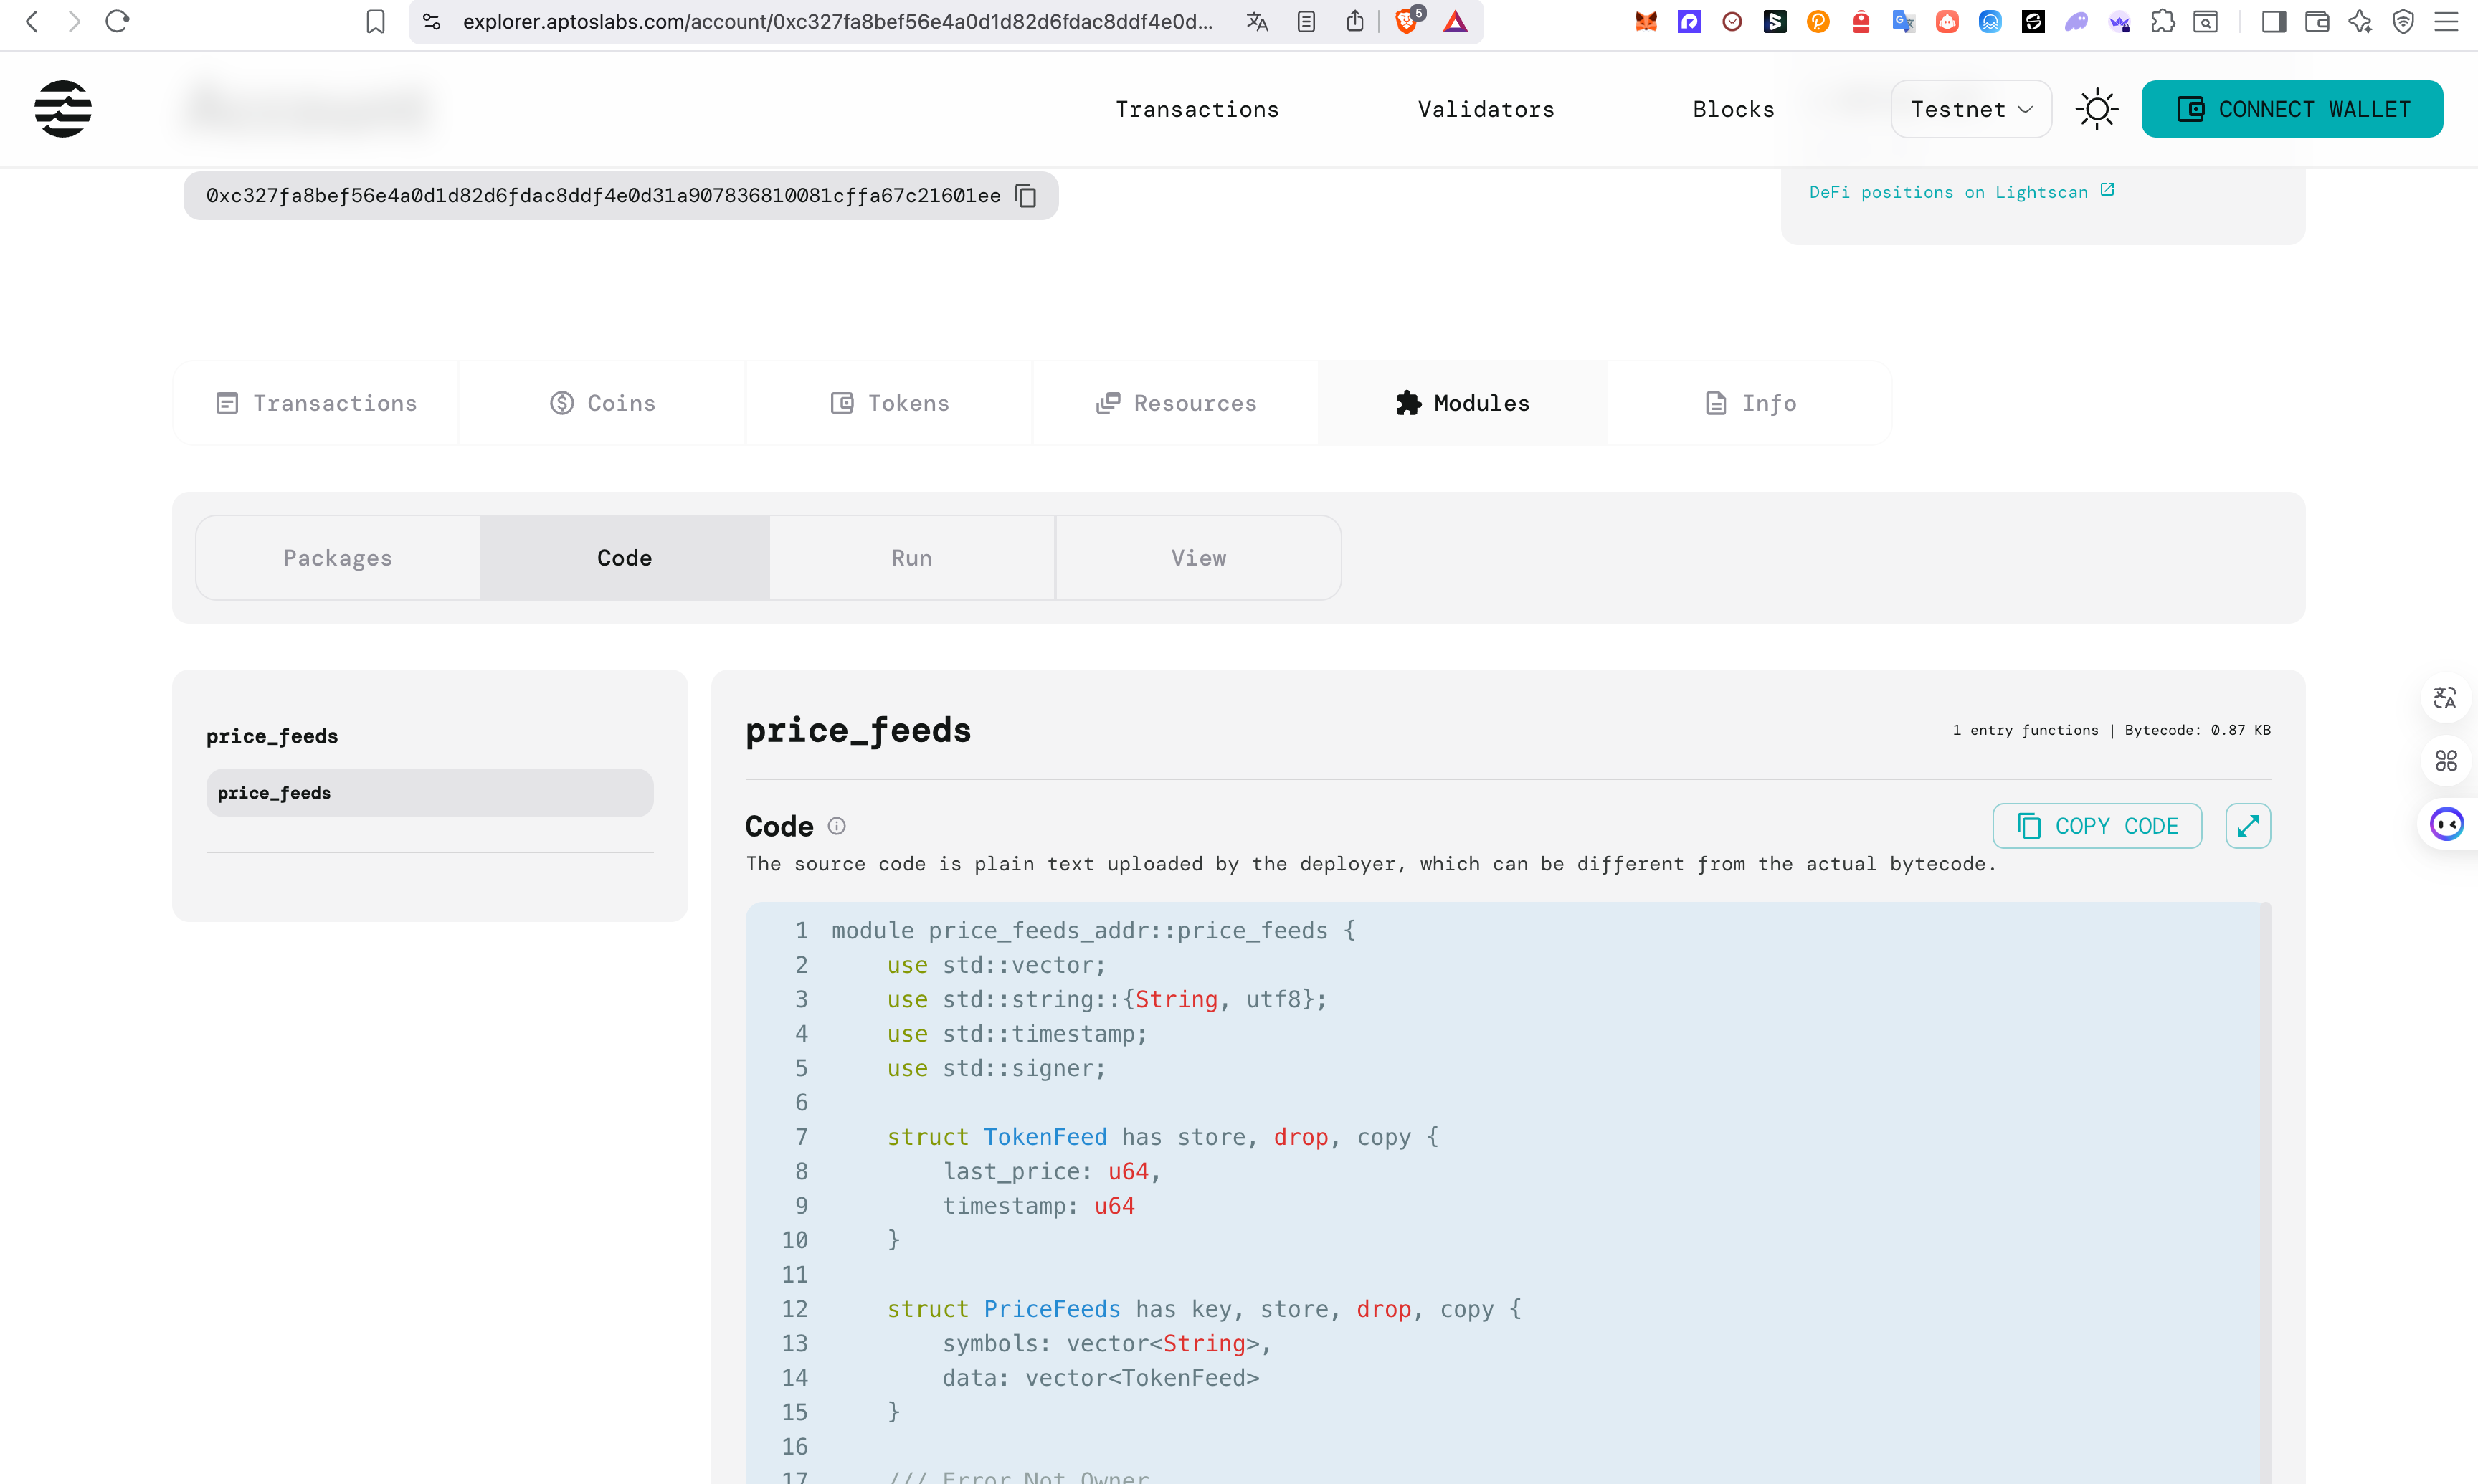
这份 Aptos Move 合约代码定义了一个名为 price_feeds 的去中心化预言机(Oracle),它的核心功能是为链上应用提供加密货币的价格数据。该合约通过两个核心资源 TokenFeed 和 PriceFeeds 来存储代币的最新价格和时间戳。模块的拥有者可以调用 update_feed 函数来更新某个代币的价格,而该函数通过访问控制确保只有合约的部署者才能修改数据。任何用户都可以通过 get_token_price 视图函数来查询指定代币的最新价格。总而言之,这段合约提供了一个简单、安全且可扩展的链上价格数据服务,特别适合在 Aptos 上构建 DeFi 应用。
编译
➜ aptos move compile
Compiling, may take a little while to download git dependencies...
UPDATING GIT DEPENDENCY https://github.com/aptos-labs/aptos-framework.git
INCLUDING DEPENDENCY AptosFramework
INCLUDING DEPENDENCY AptosStdlib
INCLUDING DEPENDENCY MoveStdlib
BUILDING price_feeds
{
"Result": [
"c327fa8bef56e4a0d1d82d6fdac8ddf4e0d31a907836810081cffa67c21601ee::price_feeds"
]
}
hello_aptos/price_feeds on main [?] took 2m 24.2s
➜ aptos move build
Compiling, may take a little while to download git dependencies...
UPDATING GIT DEPENDENCY https://github.com/aptos-labs/aptos-framework.git
INCLUDING DEPENDENCY AptosFramework
INCLUDING DEPENDENCY AptosStdlib
INCLUDING DEPENDENCY MoveStdlib
BUILDING price_feeds
{
"Result": [
"c327fa8bef56e4a0d1d82d6fdac8ddf4e0d31a907836810081cffa67c21601ee::price_feeds"
]
}
这段编译结果表明你的 Aptos Move 合约成功编译了。当你运行 aptos move compile 或 aptos move build 命令时,Aptos CLI 会自动为你处理所有依赖。它首先会下载并包含 Aptos 框架、标准库以及 Move 标准库等依赖项,然后开始构建你的 price_feeds 项目。最终的 JSON 输出 "c327fa8bef56e4a0d1d82d6fdac8ddf4e0d31a907836810081cffa67c21601ee::price_feeds" 是编译成功的标志,它明确地告诉你在 c327... 这个地址下,price_feeds 模块已经准备好部署到区块链上了。这个过程是你在将合约发布到链上之前的关键一步,确保了代码的语法和逻辑是正确的。
测试
➜ aptos move test
INCLUDING DEPENDENCY AptosFramework
INCLUDING DEPENDENCY AptosStdlib
INCLUDING DEPENDENCY MoveStdlib
BUILDING price_feeds
Running Move unit tests
[debug] 0xc327fa8bef56e4a0d1d82d6fdac8ddf4e0d31a907836810081cffa67c21601ee::price_feeds::TokenFeed {
  last_price: 63400,
  timestamp: 0
}
[debug] 0xc327fa8bef56e4a0d1d82d6fdac8ddf4e0d31a907836810081cffa67c21601ee::price_feeds::TokenFeed {
  last_price: 1000,
  timestamp: 0
}
[debug] 0xc327fa8bef56e4a0d1d82d6fdac8ddf4e0d31a907836810081cffa67c21601ee::price_feeds::TokenFeed {
  last_price: 62411,
  timestamp: 0
}
[ PASS    ] 0xc327fa8bef56e4a0d1d82d6fdac8ddf4e0d31a907836810081cffa67c21601ee::price_feeds::test_function
Test result: OK. Total tests: 1; passed: 1; failed: 0
{
  "Result": "Success"
}
这段测试结果显示,你的 Aptos Move 合约成功通过了所有单元测试。当你运行 aptos move test 命令时,它会自动编译并执行你代码中用 #[test] 标记的测试函数。结果中的 [ PASS ] 和 Test result: OK. Total tests: 1; passed: 1; failed: 0 明确表明,price_feeds 模块中的 test_function 函数在模拟环境中运行顺利,所有的断言(assert)都成功通过。此外,[debug] 输出了你在测试函数中打印的 TokenFeed 结构体,这进一步证实了价格更新和查询逻辑在本地测试环境中是完全正确的。这为你在将合约部署到真实链上提供了重要的信心。
部署合约
➜ aptos move deploy
Compiling, may take a little while to download git dependencies...
UPDATING GIT DEPENDENCY https://github.com/aptos-labs/aptos-framework.git
INCLUDING DEPENDENCY AptosFramework
INCLUDING DEPENDENCY AptosStdlib
INCLUDING DEPENDENCY MoveStdlib
BUILDING price_feeds
package size 2284 bytes
Do you want to submit a transaction for a range of [277100 - 415600] Octas at a gas unit price of 100 Octas? [yes/no] >
yes
Transaction submitted: https://explorer.aptoslabs.com/txn/0x340ab829c5f0fbdf7e552733f741e2df3dad1c57887bd23286216dba54ba3231?network=testnet
{
  "Result": {
    "transaction_hash": "0x340ab829c5f0fbdf7e552733f741e2df3dad1c57887bd23286216dba54ba3231",
    "gas_used": 2771,
    "gas_unit_price": 100,
    "sender": "c327fa8bef56e4a0d1d82d6fdac8ddf4e0d31a907836810081cffa67c21601ee",
    "sequence_number": 0,
    "replay_protector": {
      "SequenceNumber": 0
    },
    "success": true,
    "timestamp_us": 1757581679771402,
    "version": 6859001364,
    "vm_status": "Executed successfully"
  }
}
这段过程展示了将一个 Move 合约发布到 Aptos 区块链的全过程。首先,aptos move deploy 命令会自动编译你的 price_feeds 项目及其所有依赖项,将其打包成一个大小为 2284 字节的二进制文件。接着,CLI 会向你展示预估的交易燃料费,在得到你的确认后,它会构建、签名并提交一笔将合约代码发布到链上的交易。最终的 JSON 输出表明这笔交易提交成功,并且通过链上验证,状态为"Executed successfully"。这标志着你的 price_feeds 智能合约已经成功地在 c327fa8bef56e4a0d1d82d6fdac8ddf4e0d31a907836810081cffa67c21601ee 这个账户地址下永久地部署了。
deploy 与 deploy-object 区别总结
aptos move publish (或者 aptos move deploy)和 aptos move deploy-object 是两种不同的部署方式,它们有各自的用途和优缺点。
| 特性 | aptos move publish | aptos move deploy-object |
|---|---|---|
| 部署地址 | 你的账户地址 | 派生出来的对象地址 |
| 模块地址 | 你的账户地址::模块名 | 新生成的对象地址::模块名 |
| 所有权 | 由你的账户(私钥)拥有 | 可以由你的账户拥有,也可以由其他智能合约拥有 |
| 用途 | 简单合约,账户管理 | 复杂的、需要独立所有权的模块(如 DAO、协议) |
| 简单性 | 简单 | 复杂 |
| 你遇到的问题 | publish 不会有 already-assigned named address 的报错,因为它只用一个地址。 | deploy-object 可能会有这个报错,因为它在计算新的对象地址时,会检查是否与已有的命名地址冲突。 |
Aptos Object 与 Solana PDA 的对比
以下表格将清晰地展示 Aptos 的 Object 系统和 Solana 的 PDA(Program Derived Address)之间的区别与联系。
| 特性 | Aptos Object | Solana PDA |
|---|---|---|
| 核心概念 | 一种特殊的链上实体,由一个模块拥有。它能够持有数据、资产和其他对象。 | 一种没有私钥的账户,其地址由程序和种子派生而来。它能够存储数据和资产。 |
| 地址来源 | 由账户地址和命名地址(seed)确定性地派生。 | 由程序 ID 和种子确定性地派生。 |
| 所有权 | 由一个特定的模块拥有。模块的代码可以控制该对象,包括其资源的访问和管理。 | 无法被私钥签名,只能由创建它的程序控制。这使得程序可以安全地管理该账户。 |
| 主要用途 | 部署可升级的模块、创建去中心化组织(DAO)、管理协议资产、实现复杂的所有权逻辑。 | 管理程序拥有的资产、创建自定义账户、构建复杂的链上状态。 |
| 数据模型 | **资源(Resource)**被移动到 Object 下,实现了更强的类型安全和所有权保证。 | **账户数据(Account Data)**被存储在 PDA 中,通常通过序列化(如 Borsh)来管理。 |
| 主要相似点 | 两者都允许代码拥有链上实体。 它们摆脱了传统账户对私钥的依赖,为构建无信任、可编程的链上应用提供了基础。 |
客户端项目实现
mcd price_feeds_client # mkdir .. & cd ..
pnpm init
tsc --init
pnpm i @aptos-labs/ts-sdk
项目结构
➜ tree . -L 6 -I "docs|target|node_modules|build"
.
├── aptos_utils.ts
├── aptos_view.ts
├── aptos_write.ts
├── package.json
├── pnpm-lock.yaml
└── tsconfig.json

1 directory, 6 files
aptos_utils.ts 文件
import {
  Ed25519PrivateKey,
  Aptos,
  AptosConfig,
  Network,
  NetworkToNetworkName,
} from "@aptos-labs/ts-sdk";
import dotenv from "dotenv";

dotenv.config();
// console.log(process.env)

const APTOS_NETWORK: Network = NetworkToNetworkName[Network.TESTNET];
const config = new AptosConfig({ network: APTOS_NETWORK });
const aptos = new Aptos(config);
console.log("Aptos client initialized:", aptos.account.config.network);

const OWNER_PRIVATE_KEY = process.env.PRIVATE_KEY!;
// console.log(OWNER_PRIVATE_KEY);

const getSigner = async () => {
  const privateKey = new Ed25519PrivateKey(OWNER_PRIVATE_KEY);
  const signer = await aptos.deriveAccountFromPrivateKey({ privateKey });
  return signer;
};

export { aptos, getSigner };
这段客户端代码是一个 Aptos 客户端的初始化脚本,旨在为其他应用程序提供与 Aptos 区块链交互的基础服务。它首先使用 dotenv 库从 .env 文件中加载环境变量,确保私钥等敏感信息不会直接暴露在代码中。接着,它配置了一个 Aptos 客户端实例,并将其指向 Aptos 测试网(Testnet)。核心功能由 getSigner 异步函数实现,该函数使用从环境变量中获取的私钥来派生一个 Aptos 账户签名者对象(signer),这个签名者对象是进行链上交易和操作的必要凭证。通过 export 导出 aptos 客户端和 getSigner 函数,其他脚本就可以方便地使用它们来构建、签名和提交交易,从而实现与你之前编写的智能合约的交互。
aptos_write.ts 文件
import { aptos, getSigner } from "./aptos_utils";

const ACCOUNT =
  "c327fa8bef56e4a0d1d82d6fdac8ddf4e0d31a907836810081cffa67c21601ee";
const MODULE_NAME = "price_feeds";

const writeModuleFunction = async (price: string, symbol: string) => {
  const signer = await getSigner();
  const txn = await aptos.transaction.build.simple({
    sender: signer.accountAddress,
    data: {
      function: `${ACCOUNT}::${MODULE_NAME}::update_feed`,
      typeArguments: [],
      functionArguments: [price, symbol],
    },
  });

  const committedTxn = await aptos.signAndSubmitTransaction({
    signer: signer,
    transaction: txn,
  });

  await aptos.waitForTransaction({ transactionHash: committedTxn.hash });
  console.log(`Committed transaction: ${committedTxn.hash}\n`);
};

writeModuleFunction("66000", "BTC");
这段脚本的核心功能是调用 Aptos 链上的智能合约来更新价格数据。它首先使用之前定义的 getSigner 函数获取一个能够代表账户并进行签名的对象。接着,它构建了一个简单的交易,指定要调用的合约函数是 update_feed,并传入 price 和 symbol 作为参数。然后,脚本使用这个签名者对交易进行签名并提交到 Aptos 区块链。最后,它会等待交易被打包并确认,然后打印出交易哈希。这个过程展示了如何通过客户端脚本与链上合约进行交互,实现价格数据的写入功能。
运行脚本文件
➜ npx ts-node ./aptos_write.ts
[dotenv@17.2.2] injecting env (1) from .env -- tip: ⚙️ override existing env vars with { override: true }
Aptos client initialized: testnet
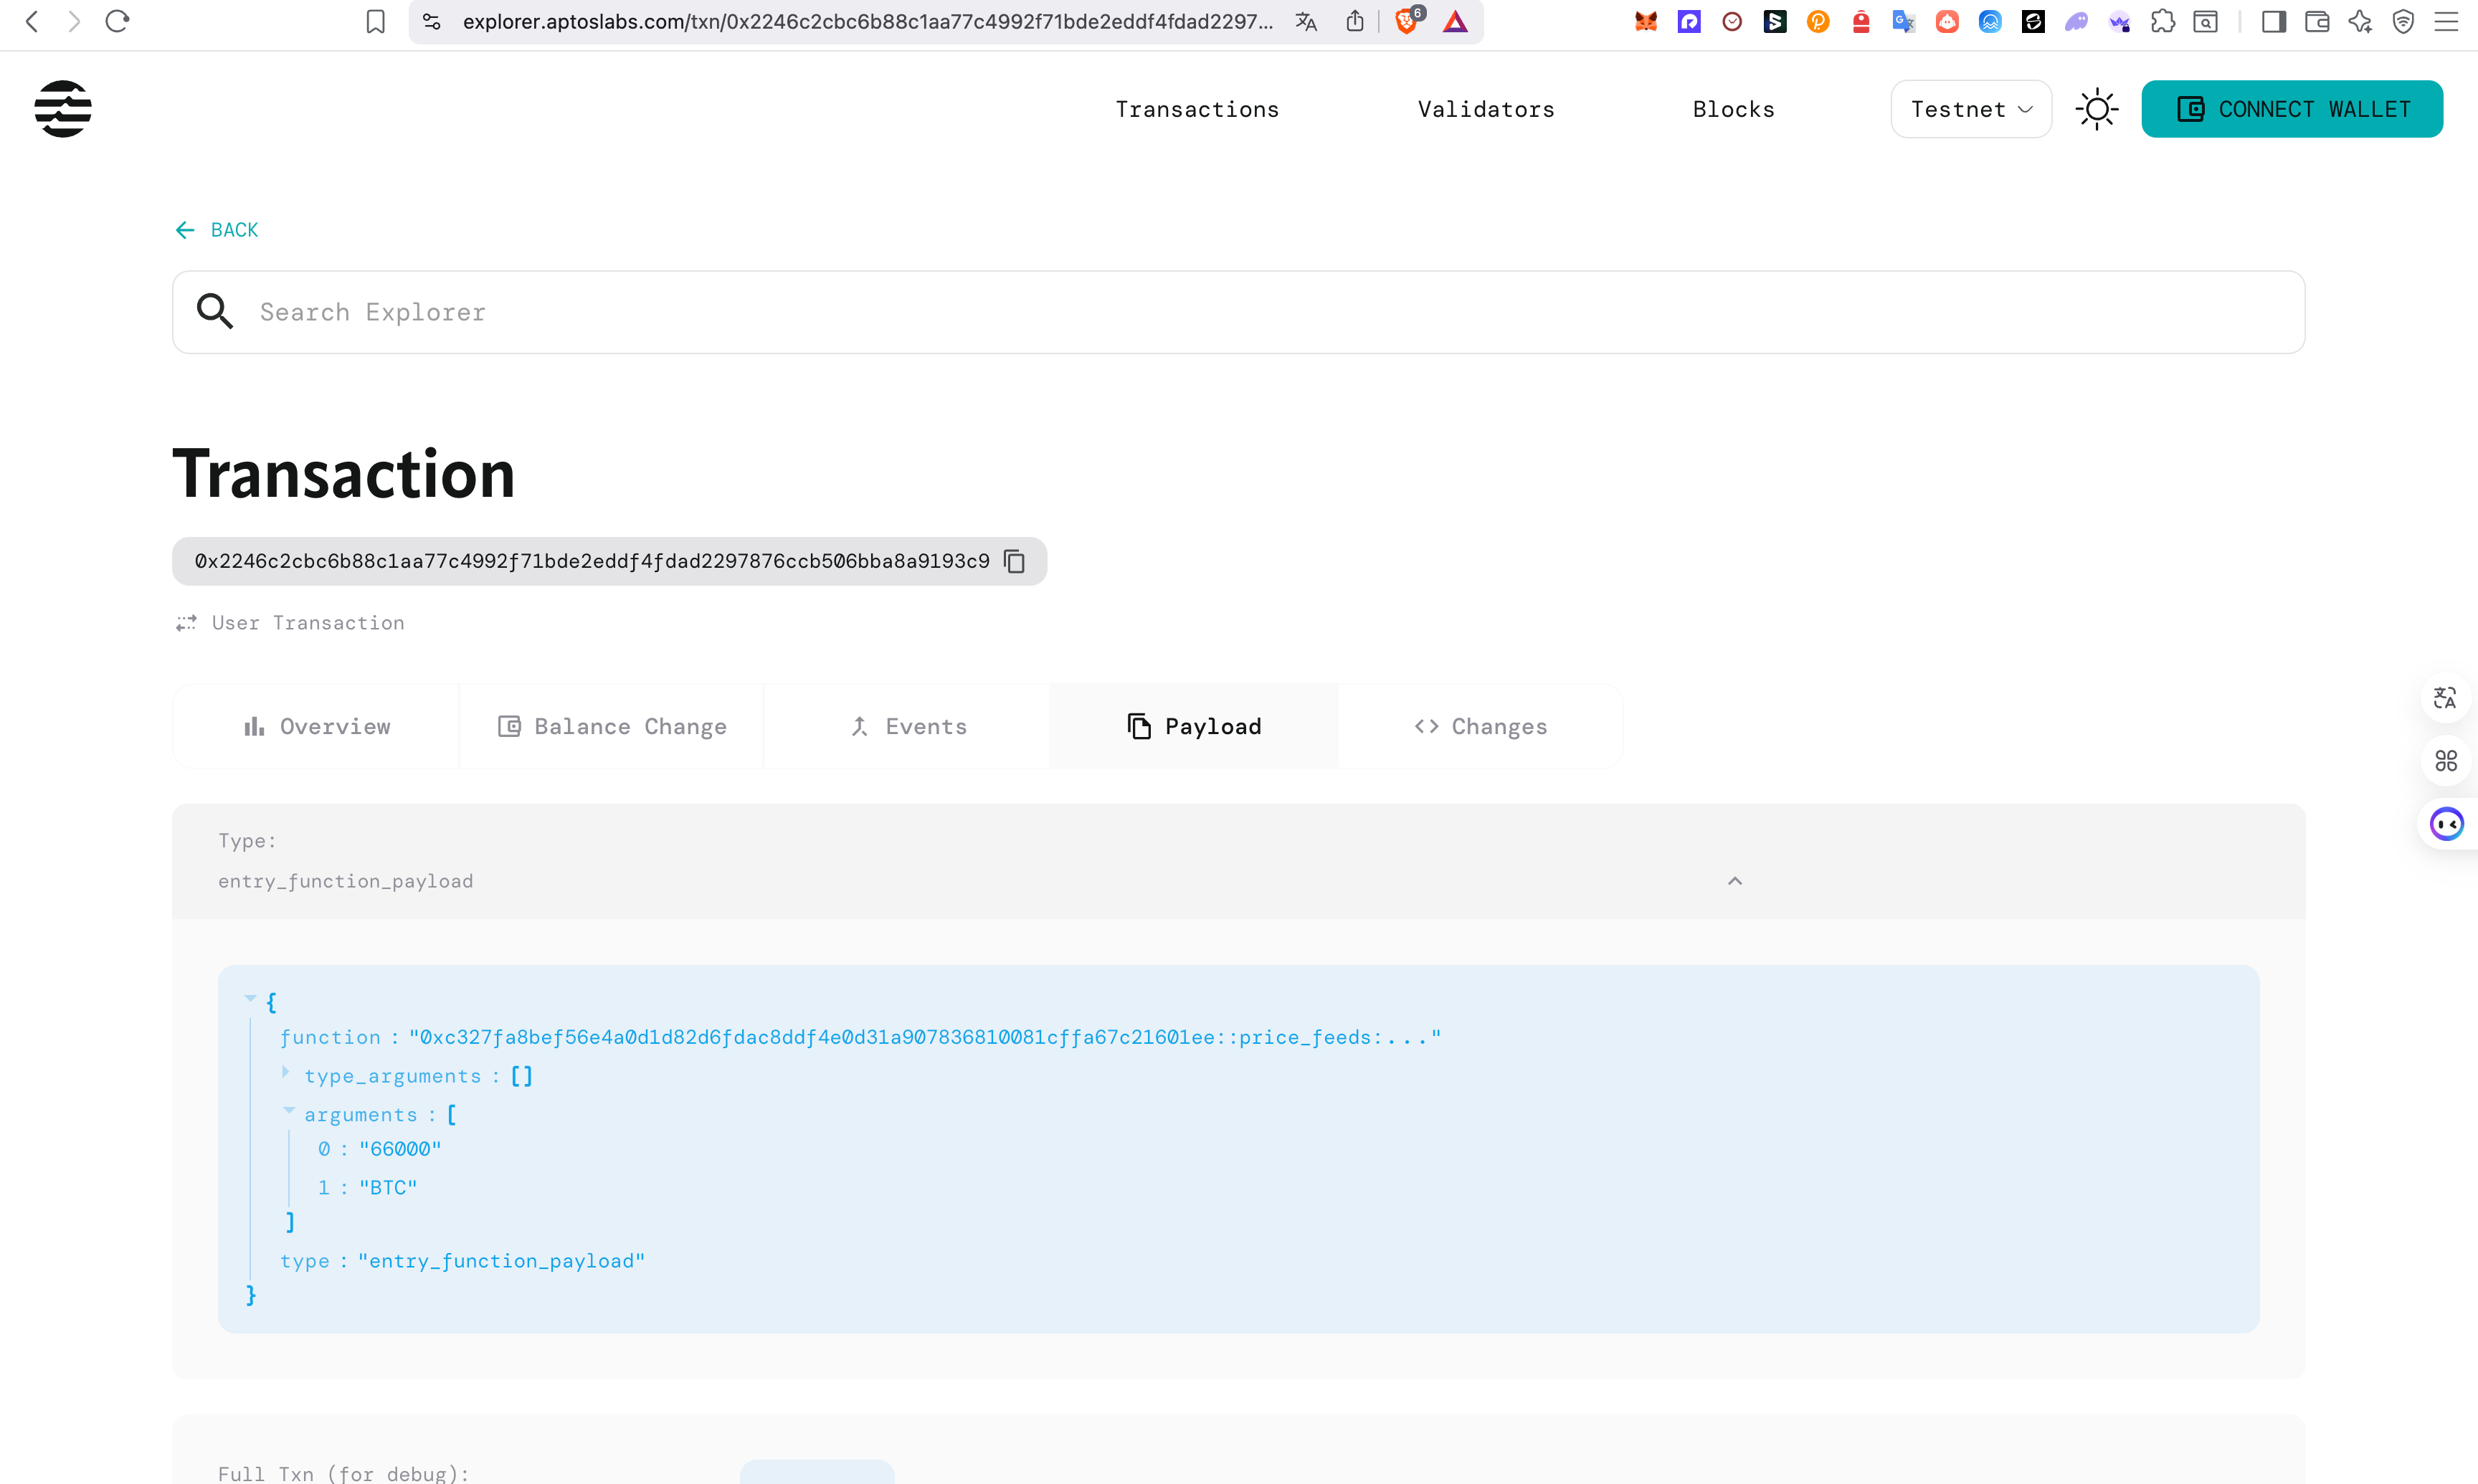
Committed transaction: 0x2246c2cbc6b88c1aa77c4992f71bde2eddf4fdad2297876ccb506bba8a9193c9
这段日志展示了执行一个用于更新链上数据的 TypeScript 脚本的整个过程。首先,npx ts-node 命令启动了你的脚本,同时 dotenv 库成功加载了 .env 文件中的环境变量。接着,脚本初始化了 Aptos 客户端,并将其配置为连接到测试网(testnet)。最后,脚本成功构建、签名并提交了一笔更新合约数据的交易。交易一旦被网络确认,终端就会输出最终的交易哈希 0x2246...,这证明你的操作已经成功地被记录在了 Aptos 区块链上。
aptos_view.ts 文件
import { aptos } from "./aptos_utils";
import { InputViewFunctionData } from "@aptos-labs/ts-sdk";

const ACCOUNT =
  "c327fa8bef56e4a0d1d82d6fdac8ddf4e0d31a907836810081cffa67c21601ee";
const MODULE_NAME = "price_feeds";

const viewModuleFunction = async (symbol: string) => {
  const payload: InputViewFunctionData = {
    function: `${ACCOUNT}::${MODULE_NAME}::get_token_price`,
    typeArguments: [],
    functionArguments: [symbol],
  };

  const result = await aptos.view({ payload });
  console.log(result);
  console.log(result[0]);

  return result;
};

viewModuleFunction("BTC");
这段代码是一个用于查询 Aptos 链上数据的客户端脚本。它首先定义了目标账户和模块名称,然后通过 viewModuleFunction 函数来构建一个查询请求。这个请求指定了要调用的是合约中的 get_token_price 视图函数,并传入代币符号("BTC")作为参数。脚本随后通过 aptos.view 命令发送请求,同步获取链上数据,并将结果打印到控制台。这种方法允许开发者无需签名和提交交易,就能直接从区块链上读取公开的、实时的价格数据。
运行脚本
➜ npx ts-node ./aptos_view.ts
[dotenv@17.2.2] injecting env (1) from .env -- tip: ⚙️  write to custom object with { processEnv: myObject }
Aptos client initialized: testnet
[ { last_price: '66000', timestamp: '1757668968' } ]
{ last_price: '66000', timestamp: '1757668968' }
这段日志展示了一个查询 Aptos 链上数据的脚本的运行过程。首先,npx ts-node 命令执行你的脚本,同时 dotenv 库成功加载了 .env 文件中的配置。接着,脚本初始化了 Aptos 客户端,并将其配置为连接到测试网。最关键的是,脚本成功地向链上发送了查询请求,并返回了正确的结果:一个包含最新价格 66000 和时间戳 1757668968 的 JSON 对象。这证明了你的读取脚本能够正确地从区块链上获取到实时数据。

总结
通过本文从合约设计、代码实现到单元测试的完整流程,我们不仅成功构建了一个功能完备的 Aptos 价格预言机,更重要的是,我们实践了一个完整的 “合约-客户端”全栈开发闭环。你学会了如何将 Move 语言编写的合约部署到链上,并掌握了使用 TypeScript 客户端进行链上数据写入(update_feed)和查询(get_token_price)的关键技术。这个实例为你展示了如何用 Move 构建一个功能完备的去中心化应用,并为你的未来项目打下了坚实的基础。
参考
- https://aptos.dev/zh/network/faucet?address=0xc327fa8bef56e4a0d1d82d6fdac8ddf4e0d31a907836810081cffa67c21601ee
- https://aptos.dev/build/sdks/ts-sdk
- https://js-pro.aptos.dev/
- https://explorer.aptoslabs.com/account/0xc327fa8bef56e4a0d1d82d6fdac8ddf4e0d31a907836810081cffa67c21601ee/modules/run/price_feeds/update_feed?network=testnet
- https://github.com/net2devcrypto/MOVE-Smart-Contracts/blob/main/index/ADVANCED/index/9/P9.md
- https://explorer.aptoslabs.com/account/0xc327fa8bef56e4a0d1d82d6fdac8ddf4e0d31a907836810081cffa67c21601ee/modules/code/price_feeds/get_token_price?network=testnet